
Episode 7: Using Ansible Roles for Common Linux Settings
Being Linux, some tweaks are needed right out of the box. Since we aren’t proper neckbeards we rely on Ansible to ensure we get them right for each new machine. It’s time to provision our Request Metrics server. There is some common configuration that applies to all Linux servers. We want this base configuration regardless of what that specific server is doing. This a great use case for an Ansible role.
Previously, we configured Ansible to connect to our server using SSH keys. Now that we have connectivity, we can get to work with some actual Ansible goodness. Here’s a selection of interesting things from our “linux-common” role.
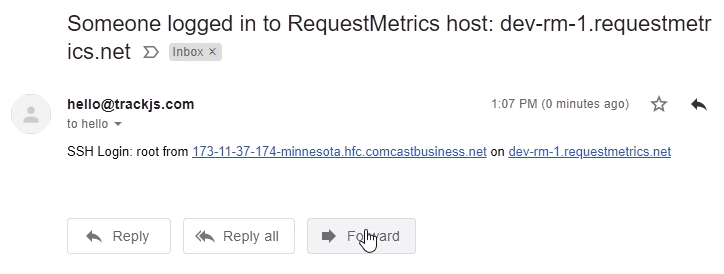
Send Email Notification on Login Using Mailgun
We don’t often login to our servers. Because it’s a rare event, we’d like to know when it happens. Sending an email with some basic information is a simple way to do this:
We hook into SSH login events using PAM and a shell script:
# Send an email notification every time someone logs in with SSH
- name: copy login-notify.sh
  copy:
    src: login-notify.sh
    dest: /etc/ssh/login-notify.sh
    mode: a+x

- name: add login-notify.sh to sshd
  blockinfile:
    dest: /etc/pam.d/sshd
    backup: yes
    insertafter: EOF
    block: |
      # Send an email when a user logs in via ssh
      session optional pam_exec.so seteuid /etc/ssh/login-notify.sh
#!/usr/bin/env bash

host="`hostname`"

if [ "$PAM_TYPE" != "close_session" ]; then
    subject="Someone logged in to host: $host"
    text="SSH Login: $PAM_USER from $PAM_RHOST on $host"
    curl -s --user 'api:MAILGUN-APIKEY-HERE' \
    https://api.mailgun.net/v3/mg.YOURDOMAIN.com/messages \
        -F from='notify@YOURDOMAIN.com' \
        -F to='notify@YOURDOMAIN.com' \
        -F subject="$subject" \
        -F text="$text"
fi
Sync Server Time With NTP
Server time seems unimportant until it drifts by minutes or hours. Logs get confusing, and software starts failing. The NTP daemon will update the local time from internet time servers to keep things in sync:
# Ensure NTP service is installed and running
- name: install NTP
  apt: pkg=ntp state=present

- name: NTP service should be online and started
  service: name=ntp enabled=yes state=started
Disable password based SSH Authentication
One of the many security commandments is, “Don’t user passwords for SSH.” We’ll be good guys here and disable password authentication in the SSH daemon configuration:
# Disable password based authentication through SSH
- name: configure ssh
  copy: src=sshd_config dest=/etc/ssh/sshd_config
  notify:
    - restart ssh
- name: restart ssh
  service: name=ssh state=restarted
# ... Default sshd_config here. Snipped for brevity ...

# ---------------------------------------------
# ONLY MATCH BLOCKS CAN GO BELOW THIS SECTION
# ---------------------------------------------

# Disable password based auth for root through ssh.
# It is expected that the public key has been configured before this config is installed.
Match all
PasswordAuthentication no
Set hostname to match the inventory file
It’s nice to have names that match, if only for our sanity (and to assuage our OCD). We set the server’s host name to the name listed in the ansible inventory file:
# Set the hostname to the one specified in the inventory file
- name: ensure correct hostname
  hostname: name='{{inventory_hostname}}'
Ansible Roles
Ansible roles behave much like playbooks in that they contain a set of tasks to be run. There are some important differences however:
- Not Run Directly roles must be referenced from a playbook and will run when the playbook is executed.
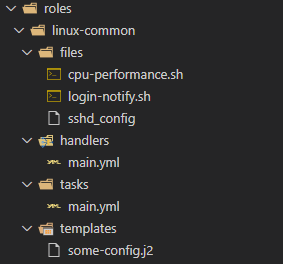
- Self Contained Roles encapsulate all tasks, handlers, files and variables needed by the role. This is accomplished through a directory naming convention. For example, our linux-common role looks like this:
- Re-useable Roles can be referenced by multiple playbooks.
- Shareable Roles can be shared with the world through Ansible Galaxy.
Ansible Tidbits
It’s easy to get started with Ansible, but some things that are good to know up front:
- Task Names Are Arbitrary Task names are optional and used to help you understand what a task is doing.
  tasks:
    - name: This name can be anything!
      ping:

    # This task does the same thing as above, but has no user friendly name
    - ping:
- Handlers Allow you to run a task only when something has changed (eg - When a service’s config changes, restart the service).
- By convention, handlers for a role are placed in a
handlersfolder inside the role.
- By convention, handlers for a role are placed in a
- Template Module Files can be created dynamically using the template module and Jinja2 templates.
- By convention, templates for a role are placed in a
templatesfolder inside the role.
- By convention, templates for a role are placed in a
- Static Files Ansible will look for static, non-template files in the
filesfolder. - Green VS Yellow Ansible Output Ansible runs return a Green (OK) or Yellow(Changed) status line for reach task in a playbook or role.
- Yellow (Changed) is shown when the module modified the server to get to the state specified in the task.
- Green (OK) is shown then the module does nothing because the server is already in the state specified in the task.
- Both Changed and OK are good unless you didn’t expect anything to change.
- Ansible tasks are usually idempotent. Subsequent runs of an unchanged playbook will make no changes to the server and result in a very green screen of results.
Now we have a Linux server that is ready to rock. Next, we’ll set up NGINX and use systemd to run our ASP.NET Core application.

