
Episode 13: Testing In .NET Core Using NUnit
Testing framework arguments are almost as bad as tabs vs spaces. We’ve definitely picked the right one though. We’re professionals. We’ve started writing application code for Request Metrics. That code needs to be tested. Before we start testing, we need a unit test framework for our .NET Core solution. We’ve used various frameworks on our .NET projects over the years, but enough has changed in .NET Core to require a small investigation into unit testing options.
Our ideal unit test framework is simple and doesn’t bog us down in boiler-plate or strict naming conventions. At the same time, it should be powerful enough to do the testing we need.
Why NUnit?
We decided to use NUnit for our tests. It has worked so far and has not yet gotten in our way. We chose it for a number of reasons:
- Easy to Set Up Just start with the pre-built project template in Visual Studio!
- Simple Interface The NUnit API makes good compromises between simplicity and features.
- Cross Platform Works on most IDE’s in both Windows and Mac.
- Bad Memories of MSTests Past We’re too traumatized to consider trying it again.
Creating a New .NET Core NUnit Test Project
The easiest way to create a new NUnit project is to use the built in Visual Studio template. The hardest part is finding it:
- Select File -> New -> Project…
- Search for “nunit test” and select “NUnit Test Project (.NET Core)”
- Name the project and click “Create”:

What Did Visual Studio Do?
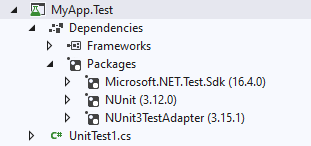
While the template didn’t do a whole lot for us, it did add one key piece of magic. Looking at package references for the test project reveals a dependency named NUnit3TestAdapter. This test adapter is what allows .NET core to run our NUnit tests as natively as if they were MSTest:
NUnit Test Basics
We’re not going deep into testing yet. We just want to verify that NUnit works in the environments and IDE’s we use. A basic test skeleton is enough for now:
using NUnit.Framework;

namespace MyApp.Test
{
    public class BasicTests
    {
        [SetUp]
        public void Setup()
        { /* This code runs BEFORE every test */ }

        [TearDown]
        public void TearDown()
        { /* This code runs AFTER every test */ }

        [Test]
        public void Test1()
        {
            var answer = 2 + 2;
            Assert.AreEqual(4, answer);
        }
    }
}
Sometimes we need to run setup code once before the test run. NUnit supports this through any class with the SetupFixture attribute:
using NUnit.Framework;

// WATCH OUT: NUnit will only run this setup fixture for
namespace MyApp.Test
{
	[SetUpFixture]
	public class OneTimeSetup
	{
		[OneTimeSetUp]
		public void RunBefore()
		{ /* This code runs once BEFORE the FIRST test */ }

		[OneTimeTearDown]
		public void RunAfter()
		{ /* This code is run once AFTER the LAST test */ }
	}
}
Our testing framework is off to a good start. We’ll put have our test project to good use next time when we start designing our Redis data model.

